+91-98777-81556 info@sepalhealthcare.com

Multi-locking Humerus Nail - 3.0/3.4mm Screws

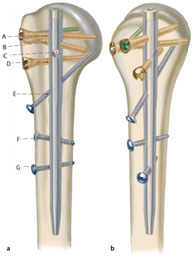
Multi-locking Humeral nails are intended to be used in simple as well as complex fractures, and have multiple locking options. They offer a widespread system for fixation of humeral fractures. The system encompasses short and long nails and screws, with multiple locking options for treatment of simple as well as complex fractures of the proximal humerus and the humeral shaft.

The main advantages of CC screws include:

These multi-lock humeral nails consist of short and long nails with multiple screw options. The short nails are indicated for the fixation of proximal humerus. The long nails are indicated for the fractures of the proximal humerus, and for the fractures of proximal humeral with diaphyseal extension, diaphyseal fractures of the humeral shaft and imminent pathological fractures.

Following are some of the advantages of the Multi-locking Humerus Nails –

Surgical Technique

Positioning the Patient:

Positioning of the patient would depend on many factors. Usually, the patient is positioned on a beach chair position, with the fractured arm resting on an adjustable side table or arm rest. It is necessary that the arm is extended enough to expose the humeral head.
In some cases, a supine position with slight modifications can also be used. Here the table has to be fully radiolucent. The C-arm has to be positioned in a way that it allows visualization of the entire humerus, opposite to the surgeon and perpendicular to the length of the humeral shaft.

Determining the Diameter of the Nail (Long)

The image intensifier is positioned on the narrowest part of the medullary canal. The radiographic ruler is placed over the humerus. The diameter gauge has to be centered over the isthmus and measurement is taken looking at the circular indicator filling the canal.

Reduction of Fracture:

With the help of indirect manoeuvres, tractions, stitches, Schanz screws or K-wires, fracture is reduced. K-wires may also be used to hold the broken fragments together on a temporary basis, but the K-wires should not block the insertion of the nails. Reduction of the fracture may be verified using image intensification.

Inserting the Guide Rod:

With the help of a Small Universal Chuck, the guide rod is partially inserted at the precise insertion point. The position of the guide rod has to be checked in both the AP view and the lateral view.

Determining the Nail Length:

The Radiographic Ruler is assembled with the extension tube and placed over the reaming rod in such a way that the tip of the assembled system is situated at the required position of the proximal nail end. Now the length of the nail is determined, and the right implant is selected.

Nail Positioning:

With the help of an appropriate aiming arm, the connecting screws are tightened. Also, the insertion depth of the nail is checked clinically and under suitable imaging technique. The rotation of the nails and screws can be adjusted using the Trocar assembly unit.

End cap Insertion:

To increase the stability of the fixation, and to prevent bony outgrowths into the proximal end of the nails, end cap insertion is recommended.

Determining the Length of the Nail (Long)

An image intensifier is placed for an AP view of the proximal humerus. A slight traction is given on the fractured humerus to get the correct length. With the help of a Radiographic Ruler held through a long clamp, the skin is marked for the desired length. The length can be determined only if the fracture is correctly reduced.

Approach:

Anterolateral approach is preferred for the surgery, with an incision at the anterolateral tip of the acromion. Care must be taken to avoid any injury to the axillary nerve.

Opening the Humerus – Determining the Entry Point –

The entry point that is preferred is at the tip of the humeral head, in line with the medullary canal.

Opening the Medullary Canal:

This process can be done using either a hollow drill bit or a cannulated awl. The main precaution that has to be kept in mind while using the awl, is to ensure that the fracture is not displaced.

Reducing the Fracture and Ream:

The reduction instrument for the Multi-locking Humeral Nailing System is inserted into the medullary canal. The reaming rod is introduced into the reduction instrument. After reduction, the reaming rod is pushed down the canal. Once the reaming rod is in place, the reduction instrument is removed.

Nail Insertion:

The insertion handle is oriented laterally according to the alignment of the insertion handle and the nail. After passing the connecting screw through the insertion handle and then to the nail, the assembly is secured with the combination wrench.
The nail is inserted into the medullary canal through twisting action. Care must be taken to avoid misalignment. The position of the nail has to be verified in AP and lateral views.

Proximal Locking:

With the help of a calibrated drill bit, the required length of the screw is determined. The multi-locking screws are attached using the screwdriver.

X
Open chat
Hello , How Can We Help You ?